Text Wrapping Around Image in Squarespace
Wrap some text around an image that works on desktop, mobile, and Squarespace Fluid Engine.
In website-land, “Text Wrapping” is the phrase we use when text wraps around an image, like this:

While this is possible to do using Classic Editor sections (just click and drag an image over a text block) it’s not possible with the new Fluid Engine sections. Additionally, even with Classic Editor, text wrapping isn’t possible on mobile.
So in today’s tutorial, we’ll create some simple text wrapping code that works on desktop, mobile, and fluid engine.
Overview
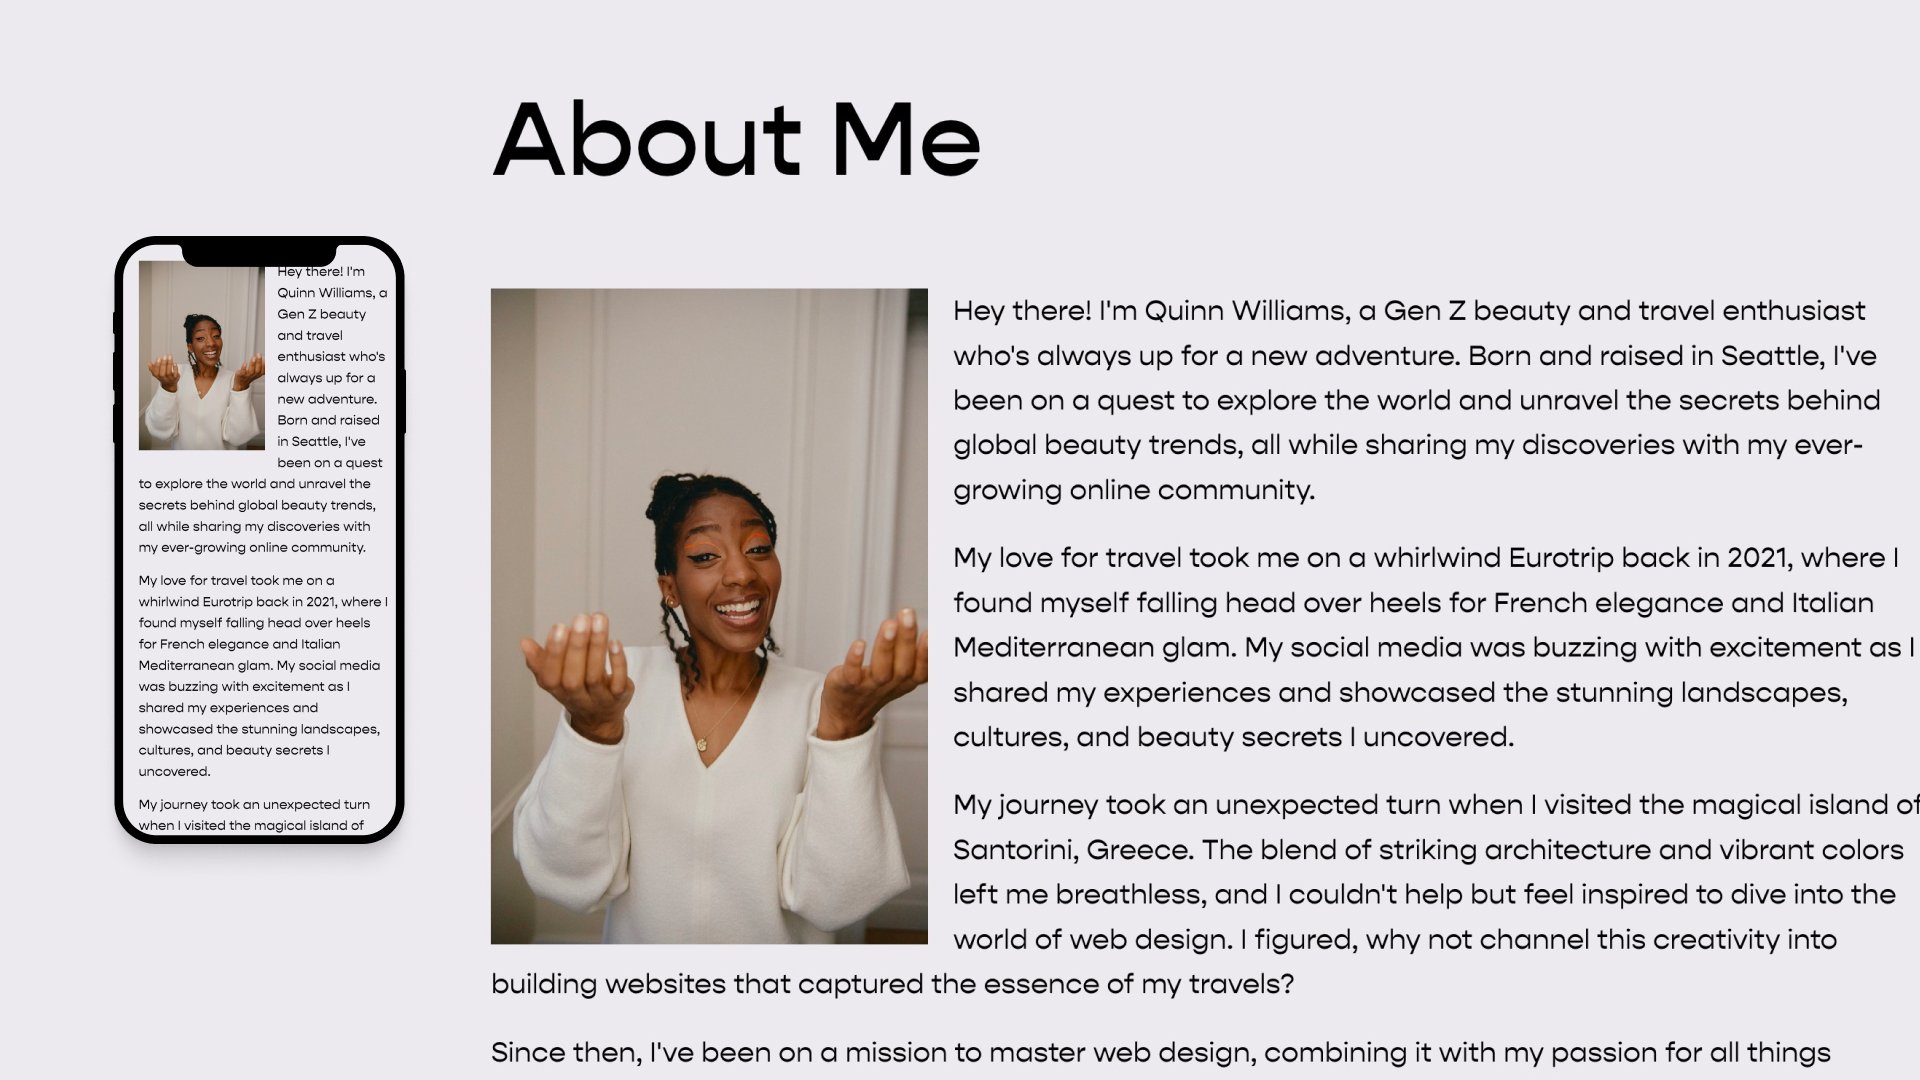
For this example, we’re going to building an “About Me” section like where the text wraps around an image. Specifically, we’ll build the below layout, where the image is on the left side.
Additional Layouts
As part of my Code Curious membership, I have code snippets that will put the image on the left side, and a code snippets that will make the image sticky on desktop and wrap on mobile.
Building the HTML
We’ll be using a Code Block* to create the HTML. The general outline for the HTML looks like this, a main container with two interior containers, one for the image and one for the text:
Main Container
Image Container
Text Container
<!-- Main Container -->
<div class="text-wrap-container">

  <!-- Image Container -->
  <div class="text-wrap--image">
    <img src="Image_Url">
  </div>

  <!-- Text Container -->
  <div class="text-wrap--text">
    ...text
  </div>

</div>
Paste that into a code block in a section on your website.
Add Your Image
We’ll need to add our image using HTML, which means we’ll need the URL of the image we want to use. Follow these steps to get your image URL:
Navigate to your Asset Library
Upload the image you want to add if it’s not there already
Right click on the image you want to add and hit “Copy Image Address”.
Paste the URL between double quotes in the HTML from above
Add your Text
To create your text, you’ll need to use HTML. If you’re unfamiliar with HTML, this is probably the most tricky part of this tutorial.
If you just paste in the raw text in the HTML between the <div class="text-wrap--text"> … </div> elements without any HTML formatting, it will present as one long paragraph, even if you have line breaks in the code.
<div class="text-wrap-container">
  <div class="text-wrap--image">
    <img src="https://images.squarespace-cdn.com/content/63da779cd195b3319c7e1676/6ef2ad1c-12b5-415e-9288-4e814f443a2e/DTS_Daniel+Faro%CC%80_Influencer_049.jpg?content-type=image%2Fjpeg">
  </div>
  <div class="text-wrap--text">
    Hey there! I'm Quinn Williams, a Gen Z beauty and travel enthusiast who's always up for a new adventure. Born and raised in Seattle, I've been on a quest to explore the world and unravel the secrets behind global beauty trends, all while sharing my discoveries with my ever-growing online community.

    My love for travel took me on a whirlwind Eurotrip back in 2021, where I found myself falling head over heels for French elegance and Italian Mediterranean glam. My social media was buzzing with excitement as I shared my experiences and showcased the stunning landscapes, cultures, and beauty secrets I uncovered.

    My journey took an unexpected turn when I visited the magical island of Santorini, Greece. The blend of striking architecture and vibrant colors left me breathless, and I couldn't help but feel inspired to dive into the world of web design. I figured, why not channel this creativity into building websites that captured the essence of my travels?

    Since then, I've been on a mission to master web design, combining it with my passion for all things beauty and travel. I've recently launched my own website, "Wanderlust & Beauty," a go-to spot for fellow globe-trotters and makeup lovers. You'll find travel guides, makeup tutorials, and sneak peeks into my awe-inspiring journey around the world.

    When I'm not exploring new places or designing websites, I'm a big advocate for sustainable and eco-friendly living. I'm always looking for ways to weave these values into my travels and everyday life. With a never-ending sense of wanderlust and a growing expertise in web design, I'm eager to keep inspiring others through my playful stories and captivating visuals. Let's go on this journey together!
  </div>
</div>
To create paragraphs, wrap each paragraph with <p> … </p> tags. Replace the p with h1, h2, h3, h4 to use a heading style.
important
Be sure that if you open up an element, like this <p>, you close it at the end of a text, like this </p>. If I’m using a header style 2 <h2>, I would need to close it like this </h2>.
In the example below, I’m using 5 paragraph styles <p>. Scroll to the far right to see how I closed each paragraph with </p>
<div class="text-wrap-container">
  <div class="text-wrap--image">
    <img src="https://images.squarespace-cdn.com/content/63da779cd195b3319c7e1676/6ef2ad1c-12b5-415e-9288-4e814f443a2e/DTS_Daniel+Faro%CC%80_Influencer_049.jpg?content-type=image%2Fjpeg">
  </div>
  <div class="text-wrap--text">
    <p>Hey there! I'm Quinn Williams, a Gen Z beauty and travel enthusiast who's always up for a new adventure. Born and raised in Seattle, I've been on a quest to explore the world and unravel the secrets behind global beauty trends, all while sharing my discoveries with my ever-growing online community.</p>
    <p>My love for travel took me on a whirlwind Eurotrip back in 2021, where I found myself falling head over heels for French elegance and Italian Mediterranean glam. My social media was buzzing with excitement as I shared my experiences and showcased the stunning landscapes, cultures, and beauty secrets I uncovered.</p>
    <p>My journey took an unexpected turn when I visited the magical island of Santorini, Greece. The blend of striking architecture and vibrant colors left me breathless, and I couldn't help but feel inspired to dive into the world of web design. I figured, why not channel this creativity into building websites that captured the essence of my travels?</p>
    <p>Since then, I've been on a mission to master web design, combining it with my passion for all things beauty and travel. I've recently launched my own website, "Wanderlust & Beauty," a go-to spot for fellow globe-trotters and makeup lovers. You'll find travel guides, makeup tutorials, and sneak peeks into my awe-inspiring journey around the world.</p>
    <p>When I'm not exploring new places or designing websites, I'm a big advocate for sustainable and eco-friendly living. I'm always looking for ways to weave these values into my travels and everyday life. With a never-ending sense of wanderlust and a growing expertise in web design, I'm eager to keep inspiring others through my playful stories and captivating visuals. Let's go on this journey together!</p>
  </div>
</div>
Text Wrapping
Now that our HTML is setup, we need to use some CSS to target the text-wrap--image container and the text-wrap--text container to create the wrapping effect.
The core property here is float which will make the image “float” on the left side and the text wrap around it. I’ve added in a max-width so the image doesn’t get larger than 300px on desktop, and a general width so the image stays at 50% on mobile. I’ve also thrown in some padding to make give the text some breathing room.
/**
 * Text Wrapping Around Image
 * Left Aligned
 * From Will-Myers.com
**/
.text-wrap-container{
  display:block;
  .text-wrap--image{
    float: left;
    width: 50%;
    max-width: 300px;
    padding-right: 17px;
  }
  img {
    display:block;
  }
}
If you use the final code below, I’ve added in some variables to allow you adjust the layout more easily.
Join my Code Curious membership for a right aligned text wrapping code and a sticky-on-desktop-wrapped-on-mobile version of this code (like below), plus many more code snippets, tutorials, and professional website building resources.
Final Code
Paste this into a Code Block*. Replace the Image_Url using and the paragraph text in the HTML.
<div class="text-wrap-container">
  <div class="text-wrap--image">
    <img src="Image_URL">
  </div>
  <div class="text-wrap--text">
    <p>Hey there! I'm Quinn Williams, a Gen Z beauty and travel enthusiast who's always up for a new adventure. Born and raised in Seattle, I've been on a quest to explore the world and unravel the secrets behind global beauty trends, all while sharing my discoveries with my ever-growing online community.</p>
    <p>My love for travel took me on a whirlwind Eurotrip back in 2021, where I found myself falling head over heels for French elegance and Italian Mediterranean glam. My social media was buzzing with excitement as I shared my experiences and showcased the stunning landscapes, cultures, and beauty secrets I uncovered.</p>
    <p>My journey took an unexpected turn when I visited the magical island of Santorini, Greece. The blend of striking architecture and vibrant colors left me breathless, and I couldn't help but feel inspired to dive into the world of web design. I figured, why not channel this creativity into building websites that captured the essence of my travels?</p>
    <p>Since then, I've been on a mission to master web design, combining it with my passion for all things beauty and travel. I've recently launched my own website, "Wanderlust & Beauty," a go-to spot for fellow globe-trotters and makeup lovers. You'll find travel guides, makeup tutorials, and sneak peeks into my awe-inspiring journey around the world.</p>
    <p>When I'm not exploring new places or designing websites, I'm a big advocate for sustainable and eco-friendly living. I'm always looking for ways to weave these values into my travels and everyday life. With a never-ending sense of wanderlust and a growing expertise in web design, I'm eager to keep inspiring others through my playful stories and captivating visuals. Let's go on this journey together!</p>
  </div>
</div>
Paste this into your Design » Custom CSS area.
/**
 * Text Wrapping Around Image
 * Left Aligned
 * From Will-Myers.com
**/
.text-wrap-container{
  --width:50%;
  --max-width:300px;
  --spacing:17px;

  display:block;
  .text-wrap--image{
    position:relative;
    float: left;
    width: var(--width);
    padding-right: var(--spacing);
    max-width: var(--max-width);
  }
  img {
    display:block;
  }
}
* Use a Markdown Block if you’re on a personal plan, be sure to remove comments.
Related Code Snippets
The below Code Snippets are available to Code Curious members.