List Section Image Overlays
Choose from 6 different CSS customizations to add an overlay on top of your list section items. Use gradients, multiple colors, or add a hover effect.
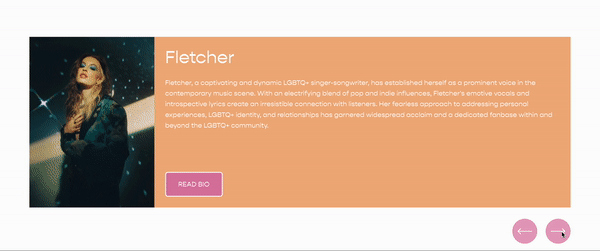
Simple List Section
Unify the coloring of your teams headshots by adding a colorful overlay to each image.

Copy and paste the below code into your Custom CSS area. Adjust the background and opacity values as desired.
/**
* Simple List
* From Will-Myers.com
**/
.user-items-list-simple .list-item-media-inner:after{
  content:'';
  top:0;
  left:0;
  height:100%;
  width:100%;
  position: absolute;
  background: #F2B182;
  opacity: 0.4;
}
Slideshow List Section
Provide some contrast between your text and slideshow image with an overlay.
Copy and paste the below code into your Custom CSS area. Adjust the background and opacity values as desired.
/**
* Slideshow List
* From Will-Myers.com
**/
.user-items-list-banner-slideshow .slide-media-container:after{
  content:'';
  top:0;
  left:0;
  height:100%;
  width:100%;
  position: absolute;
  background: black;
  opacity: 0.4
}
Carousel List Section
Sure, why not apply this to our carousel items as well.

Copy and paste the below code into your Custom CSS area. Adjust the background and opacity values as desired.
/**
* Carousel List
* From Will-Myers.com
**/
.user-items-list-carousel .user-items-list-carousel__media-inner:after{
  content:'';
  top:0;
  left:0;
  height:100%;
  width:100%;
  position: absolute;
  background: #4F57CE;
  opacity: 0.4
}
I’m using here a common CSS pattern that’s used to create overlays on top of any element (doesn’t have to be just an image).
Using the css pseudo-element ::after on the parent element of an image, I can add an element directly after our image.
With position: absolute; set on an element, I can use the top and left properties to position my overlay within the parent container, which is what I’m targeting in each of the code snippets above.
Accent your photos with a fun gradient using your brands colors.

You can also use a gradient overlay on the image by replacing the background value with a linear-gradient function. In the example below, I’ve applied a gradient with pinkish hue in the top left, which transitions to transparent in the middle, and then to a violet hue in the bottom right. So this gradient moves to bottom right.
/**
* Simple List
* Gradient Effect
* From Will-Myers.com
**/
.user-items-list-simple .list-item-media-inner:after{
  content:'';
  top:0;
  left:0;
  height:100%;
  width:100%;
  position: absolute;
  background: linear-gradient(
    to bottom right,
    #F2B182 0%,
    transparent 50%,
    #4F57CE 100%
  );
  opacity: 0.4
}Loop through your list items and use a different overlay color for each one.

This is a fun customization where you can style list items at a given interval.
In the code below, we’re applying different overlay colors to each list item using an interval of three. So items:
1, 4, 7, etc. get color #F2B182
2, 5, 8, etc. get color #4F57CE
3, 6, 9, etc. get color #DC7BA7
/**
* Simple List
* Multi-Color Effect
* From Will-Myers.com
**/
.user-items-list-simple .list-item:nth-of-type(3n + 1){
  --color: #f2b182;
}
.user-items-list-simple .list-item:nth-of-type(3n + 2){
  --color: #4F57CE;
}
.user-items-list-simple .list-item:nth-of-type(3n + 3){
  --color: #DC7BA7;
}
.user-items-list-simple .list-item-media-inner:after{
  content:'';
  top:0;
  left:0;
  height:100%;
  width:100%;
  position: absolute;
  background: var(--color);
  opacity: 0.4
}Bring your photos to life with a simple hover over effect.
There are a number of different hover effects we can do, but I’m just going to focus on one that highlights the image as you hover over a specific item.
I want to highlight the image by removing the overlay and doing a zoom on the image.
/**
* Simple List
* Multi-Color Effect
* From Will-Myers.com
**/
.user-items-list-simple {
  li {
    pointer-events: initial;
  }
  img {
    transition: transform 0.5s ease;
  }
  .list-item-media-inner:after{
    content:'';
    top:0;
    left:0;
    height:100%;
    width:100%;
    position: absolute;
    background: var(--color);
    opacity: 0.4;
    transition: opacity 0.5s ease;
  }
}

/*Hover Effects*/
.user-items-list-simple   .list-item:hover{
  img {
    transform: scale(1.1)
  }
  .list-item-media-inner:after {
    opacity:0;
  }
}
Related Code Snippets
The below Code Snippets are available to Code Curious members.